SLING workshop FRI 9.11.2017
Kazalo/Content
Prerequisites for using the SLING infrastructure
For this workshop the environment is already set and the demo certificate installed on the system. We will work without the VO membership, the cluster is configured to accept your certificates.
Otherwise, in order to use the SLING infrastructure or follow this workshop on your own computer, you need to follow the procedure below.
- Request SiGNET certificate
- Request form: http://signet-ca.ijs.si/CA-formular.pdf
- Fist-time users need to present personal photo ID at SiGNET CA offices: in Ljubljana at FRI and JSI, in Novo mesto at FIS, in Maribor at UM and in Nova Gorica at UNG. See this page for more details.
- Send your request by filling out the form on http://signet-ca.ijs.si/pub/
- Certificate installation
openssl pkcs12 -in usercert.p12 -clcerts -nokeys -out usercert.pem
openssl pkcs12 -in usercert.p12 -nocerts -out userkey.pem
chmod 400 userkey.pem
chmod 644 usercert.pem
mv userkey.pem ~/.arc/
mv usercert.pem ~/.arc/
- Virtual organization membership
- In order to use the grid, all researchers and students must be members of at least one virtual organization (VO).
- Slovenian supercomputing infrastructure can be used by joining the national VO gen.vo.sling.si. To join, follow this page: https://voms.sling.si:8443/voms/gen.vo.sling.si
- FRI has its own virtual organization. Join this VO as well (some clusters give this VO higher priority): https://voms.sling.si:8443/voms/fri.vo.sling.si
- With SiGNET certificate you can also use EGI (European Grid Initiative) resources, by joining an international VO, based on your project membership or field of research. The list of international VO-s is available on this address: https://operations-portal.egi.eu/vo/search
- EGI-trustanchors repository and CA-s installation
- Detailed instructions are available in the ARC Client installation instructions (see section 5), general information is available here: https://wiki.egi.eu/wiki/EGI_IGTF_Release
- Note: CA-s need to be updated regularly. It is best to install fetch-crl package (fetch-crl tool updates the CA-s when run) and put in into the cron job (run it at least once a day). Fetch-crl must be run as root.
- ARC client installation and VOMS settings
- Follow the ARC Client installation instructions, that are available on this plight vitualizationage (mostly in Slovenian): http://www-old.sling.si/sling/uporabniki/uporabniski-vmesniki/
- VOMS settings for gen.vo.sling.si and fri.vo.sling.si are summarized here:
cd ~/.arc
mkdir -p vomsdir/gen.vo.sling.si
cat vomsdir/gen.vo.sling.si/voms.sling.si.lsc
/C=SI/O=SiGNET/O=SLING/CN=voms.sling.si
/C=SI/O=SiGNET/CN=SiGNET CA

cat vomses/gen.vo.sling.si
"gen.vo.sling.si" "voms.sling.si" "15001" "/C=SI/O=SiGNET/O=SLING/CN=voms.sling.si""gen.vo.sling.si"
cd ~/.arc
mkdir -p vomsdir/fri.vo.sling.si
cat vomsdir/fri.vo.sling.si/voms.sling.si.lsc
/C=SI/O=SiGNET/O=SLING/CN=voms.sling.si
/C=SI/O=SiGNET/CN=SiGNET CA

cat vomses/fri.vo.sling.si
"fri.vo.sling.si" "voms.sling.si" "15003" "/C=SI/O=SiGNET/O=SLING/CN=voms.sling.si" "fri.vo.sling.si"
The above set-up is required for using the infrastructure from your own computer. If you are using it through the pre-prepared virtual machine image, please proceed to the following sections.
Anatomy of a Supercomputing Cluster Network
Scaling the CPU power
While the development in processor and system architecture has yielded multi-socket systems with multi-core processors and system architectures these days support their underlying NUMA architectures, many tasks surpass what can be achieved with a single computer system.
There are different architectures that enable the construction of single operating system image systems, where a number of computers with a low latency network interconnect behave as a single machine, but such systems are difficult to manage and they stretch the operating system paradigm so far in the non-uniform layers that efficiency becomes a serious problems.
For this reason, most heavy computing tasks are performed on networked computing clusters (in specialized computing centres or on cloud infrastructure). Hundreds of individual computers (called “worker nodes”) are interconnected with fast networks, often low-latency enabled networks (InfiniBand and custom variants), provided with networked file systems and manged by specialized servers.
Managing the Load
It would be very difficult to use such a system efficiently if every user was to connect to individual machines and run their applications directly on them. Traditionally, the problem is solved by the use of a “batch system” that accepts information on what application the user wants to be run and then runs it on one or several of the computers when the become available. If all the computers are in use, the request (“the job”) is put in a queue and wait for the resources to be available.
Batch systems have been in use for half a century because they offer a number of advantages when managing a large computing resource for many users:
- load balancing – the system can assign the jobs to the best resources
- fair share use – the data on system use is available, so the system can be configured to allow fair share of the resources to be used by users, groups etc., and reservations and manual overrides to manage special situations
- better resource usage – when sufficient data is available, the scheduling of jobs can be perfomed in such a way as to maximize the resource availability – example: instead of spreading out small jobs, they can be concentrated to allow some computers to be completely freed up for computing tasks with large memory requirements etc.
A number of important additional features have developed in the supercomputing and grid community. One of the more important from the user perspective is the management of software. When starting their work, it is natural for users to require the most recent computing environment, compilers, libraries and applications. But when they are nearing the end of their project, they need their environment to remain stable. To facilitate these requirements, supercomputing systems package the software in “runtime environments”. There are different technologies – the most pervasive (installable on any POSIX-like system) being “environment modules” and the most recent different light vitualization technologies.
Data
In the times where “Big Data” is a term we use every day, it is worth considering that a number of jobs in modern clusters, where the clusters are suitably equipped with High Throuhgput Computing software and features, many jobs process frmo 100 to 250 GB in 5 to 6 hour runs, which amounts to 112 TB per hour or 260 Gbits/s. Which this considertaion, data management is a serious matter.
Conceptually, clusters feature the following data spaces:
- scratch space – local to your process, directly on the node (or in a high-speed localized storage on some supercomputers)
- networked job home – on a possibly parallel and high speed networked file system, where all the processes in a single job are gauranteed to access the same disk space – so data sharing is possible
- mid-term storage space – usually a larger data storage system in the same or even in a remote data center, where data can be retrieved from before and stored after processing – but is too remote to be accessed during the run.
Distributed Network
Grid middleware is used for better load balancing, data management and uniformed distribution in grids and in supercomputing centres. The use of grid middleware is important to allow similar compatible interfaces on different clusters, data management, including remote storage and replication, data expulsion, user management and better resource utilization – since gird interfaces require users to provide job requirement descriptions.
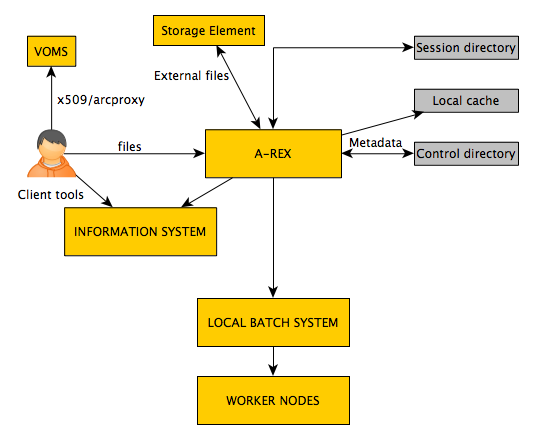
ARC middleware – how does it work?
ARC server provides 3 main interfaces:
- job submission interface
- file access interface
- information query interface
ARC CE main services:
- Grid-manager = the execution service (communicates with LRMS)
- Information system services
- GridFTP Server (GFS)
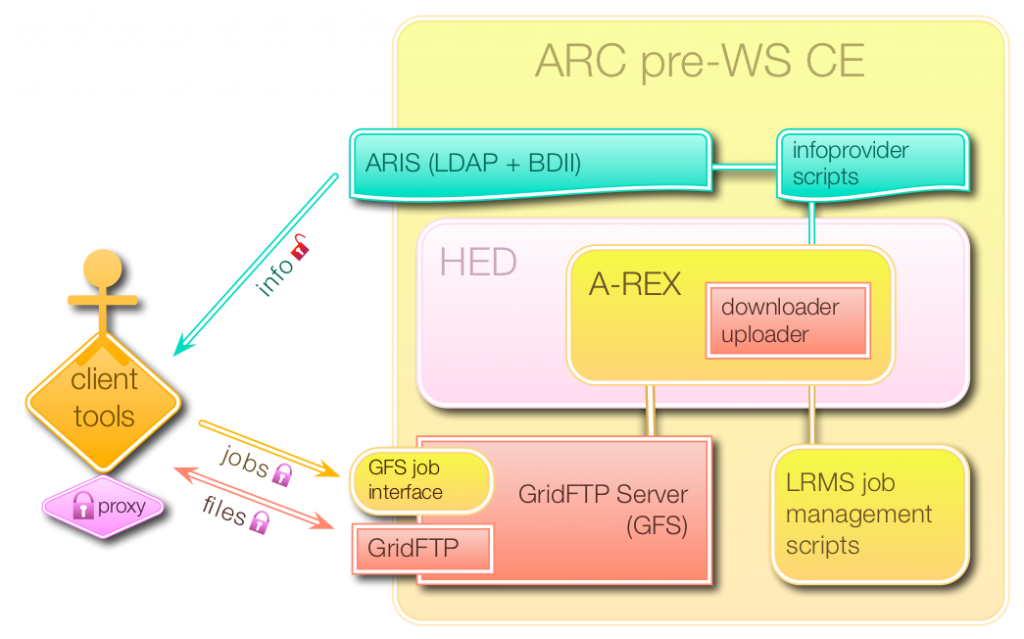
The interfaces (source: nordugrid.org)
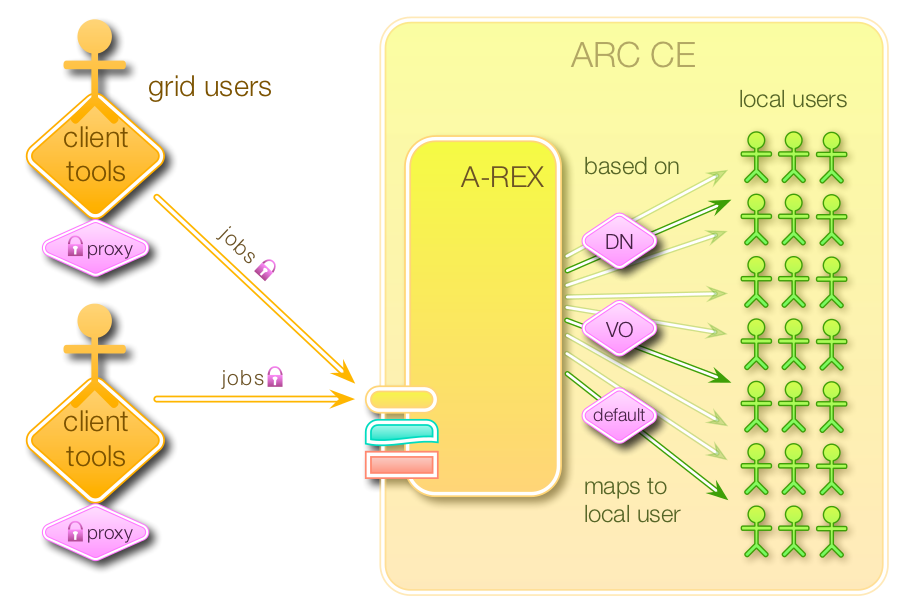
User mapping (source: nordugrid.org):
Job handling by A-REX (source: nordugrid.org):
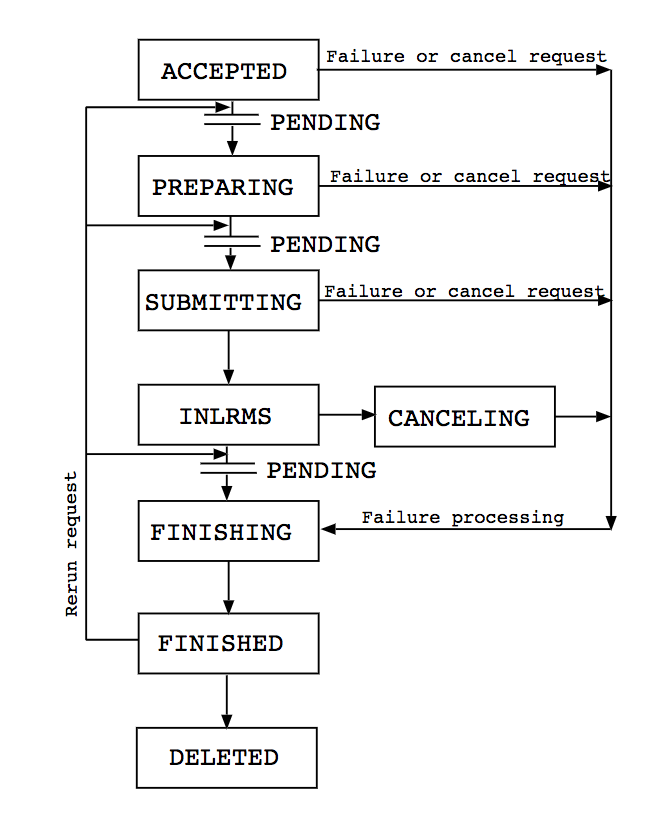
Job submission:
ARC client usage
ARC client is the part of the grid middleware that is used directly by the user to manage their jobs and data. The official documentation is available here.
Some common commands are necessarry to be able to use the system.
To see available services and interfaces of a certain cluster:
$ arcinfo jost.arnes.si
Computing service: Arnes (production)
Information endpoint: ldap://jost.arnes.si:2135/Mds-Vo-Name=local,o=grid
Information endpoint: ldap://jost.arnes.si:2135/Mds-Vo-Name=resource,o=grid
Information endpoint: ldap://jost.arnes.si:2135/o=glue
Information endpoint: https://jost.arnes.si:443/arex
Information endpoint: https://jost.arnes.si:443/arex
Submission endpoint: https://jost.arnes.si:443/arex \
(status: ok, interface: org.ogf.bes)
Submission endpoint: https://jost.arnes.si:443/arex \
(status: ok, interface: org.ogf.glue.emies.activitycreation)
Submission endpoint: gsiftp://jost.arnes.si:2811/jobs \
(status: ok, interface: org.nordugrid.gridftpjob)
There are two interfaces that can be used for job submission: via HTTPS or GRIDFTP. You can specify the preferred protocol in the client configuration, see examples below.
For GRIDFTP:
[computing/jost]
url=ldap://jost.arnes.si:2135
infointerface=org.nordugrid.ldapng
submissioninterface=org.nordugrid.gridftpjob
For HTTPS:
[computing/jost]
url=https://jost.arnes.si:443/arex
infointerface=org.ogf.glue.emies.resourceinfo
submissioninterface=org.ogf.glue.emies.activitycreation
default=yes
Create a proxy
Before using the cluster (before job submission, job retrieval etc) a proxy certificate has to be created, using your certificate. By default proxy certificate is only valid for 12 hours (up to 24 hours). For long-term proxies, myproxy service has to be used or arcproxy has to be renewed.
arcproxy #create a proxy
arcproxy -S gen.vo.sling.si #create a proxy for gen.vo.sling.si
arcproxy –I #check the proxy information
arcproxy -S gen.vo.sling.si -c validityPeriod=24h -c vomsACvalidityPeriod=24h
arcrenew #renew the proxy
Useful commands for job management
#job submission
arcsub
arcsub –c jost.arnes.si test.xrsl
arcsub –c jost.arnes.si test.xrsl -d DEBUG #debug mode

#check status of the job
arcstat
arcstat JOBID  #check job with ID
arcstat -a #check the status of all submitted jobs

#check stdout/stderr of a running job
arccat
arccat JOBID or arccat -a

#retrieve results (they are deleted from the cluster)
arcget
arcget JOBID ali arcget –a
arcget -K #keep the results on the cluster after the transmission

#cancel/kill the jobs
arckill #kills/cancels all active jobs
arcclean #clean the jobs

#resume the jobs
arcresume #required after arcrenew
Check the help and man pages for more detail.
Job statuses

Basic commands for data management
Data management on external location (e.g. dcache.arnes.si):
arcls #list content of the directory
arccp #copy
arcrm #remove
arcmkdir #create folder
arcrename #rename the document
Other useful ARC commands
arcinfo jost.arnes.si #check the status of the cluster
arcsync #sync the job list from the cluster
arctest #send a test job
How to debug a failed job?
If a job fails, you will get the error messages from the grid-manager. See the grid-manager log files in the retrieved log folder. The name of the folder depends on your setting in xrsl, for example:
(gmlog="log")
For example:
cat log/failed
LRMS error: (-1) Job was cancelled
This error tells us that the job was cancelled. If the user did not cancel it, the error message doesn’t explain much. In this case, we have to check the errors log:
cat log/errors
job submitted successfully!
local job id: 2078340
----- exiting submit_slurm_job -----

2017-10-04T12:36:46Z Job state change SUBMIT -> INLRMS   Reason: Job is passed to LRMS
------- Contents of output stream forwarded by the LRMS ---------
slurmstepd: error: Job 2078340 exceeded virtual memory limit (134084 > 4096), being killed
/bin/bash: error while loading shared libraries: libdl.so.2: failed to map segment from shared object
slurmstepd: error: Exceeded job memory limit
------------------------- End of output -------------------------
2017-10-04T12:37:41Z Job state change INLRMS -> FINISHING   Reason: Job processing error
2017-10-04T12:37:41Z Job state change FINISHING -> FINISHED   Reason: Job processing error
If you can see “job submitted successfully”, it is obvious that nothing went wrong on the server side, since the job got to the LRMS. In the LRMS output, we can see, that the job was killed, because it exceeded the virtual memory limit. We have to increase the required amount of memory in the description file.
xRSL job description
The documentation is available here: http://www.nordugrid.org/documents/xrsl.pdf
This is an example of the xrsl job description.
  &
  (executable = /usr/bin/env)
  (jobname = "test")

  (stdout=test.log)
  (join=yes)
  (gmlog=log)
  (memory=1000)
Example with input and output files on external location:
&
(executable="execution_script.sh")
(stdout="stdout.txt")
(join=yes)
(stdin="stdin.txt")
(inputFiles=
    ("stdin.txt" "http://www.external-url.com/example/stdin.txt")
    ("file1.py" "gsiftp://dcache.arnes.si/data/arnes.si/gen.vo.sling.si/file1.py")
    ("file2.py" "gsiftp://dcache.arnes.si/data/arnes.si/gen.vo.sling.si/file2.py")
)
(outputFiles=
    ("output1.txt" "gsiftp://dcache.arnes.si/data/arnes.si/gen.vo.sling.si/output1.txt")
    ("output2.txt" "gsiftp://dcache.arnes.si/data/arnes.si/gen.vo.sling.si/output2.txt")
)
Simple job examples
Before you begin with the job submission, create a proxy:
arcproxy
Check its validity:
arcproxy -I
Subject: /C=SI/O=SiGNET/O=SLING/OU=ARCSchoool FRI 2017/CN=Arc School Student 01/CN=1936774291
Issuer: /C=SI/O=SiGNET/O=SLING/OU=ARCSchoool FRI 2017/CN=Arc School Student 01
Identity: /C=SI/O=SiGNET/O=SLING/OU=ARCSchoool FRI 2017/CN=Arc School Student 01
Time left for proxy: 11 hours 59 minutes 51 seconds
Proxy path: /tmp/x509up_u541
Proxy type: X.509 Proxy Certificate Profile RFC compliant impersonation proxy - RFC inheritAll proxy
Proxy key length: 1024
Proxy signature: sha512
Helloworld example
Job description hellogrid.xrsl
&
(executable=hellogrid.sh)
(wallTime="5 minutes")
(stdout="stdout.txt")
(stderr="stderr.txt")
(runtimeenvironment="APPS/DEMO/DEFAULT")
Shell script: hellogrid.sh
#!/bin/sh
echo "Hello, grid"
Send the job to the cluster
arcsub -c jost.arnes.si hellogrid.xrsl
Check the status and retrieve the results.
Runtime environments
Software packages which are preinstalled on a computing resource and made available on the cluster. The list of the available RTE-s in available by querying the information system or by selecting the cluster on the Grid Monitor.
The query for the information system:
ldapsearch -x -h jost.arnes.si -p 2135 -b ' Mds-Vo-name=local,o=grid' \
| grep nordugrid-cluster-runtimeenvironment
You can send the software also as input file with the job, but it is not recommended if its size exceeds 100MB. If the software you require is not available on the cluster, send an email to support@sling.si and the local administrator will arrange it for you. You can also put the binaries on the SLING storage system (dcache.arnes.si) and specify its location in the xrsl.
To specify a certain environment in the description file:
(runtimeenvironment="APPS/BASE/GPU"
OpenMPI example using infiniband network
Infiniband network ensures low latency and is recommended for multicore jobs.
Helloworld example using OpenMPI:
First the program hellompi.c
/* C Example */
#include <stdio.h>
#include <mpi.h>


int main (argc, argv)
     int argc;
     char *argv[];
{
  int rank, size;

  MPI_Init (&argc, &argv);      /* starts MPI */
  MPI_Comm_rank (MPI_COMM_WORLD, &rank);        /* get current process id */
  MPI_Comm_size (MPI_COMM_WORLD, &size);        /* get number of processes */
  printf( "Hello world from process %d of %d\n", rank, size );
  MPI_Finalize();
  return 0;
}
Write the executable:
#!/bin/bash
date
hostname
echo "Compiling example"
mpicc -o hello hellompi.c
echo "Done."
echo "Running example:"
mpirun --mca btl openib,self -np 4 ${PWD}/hello > hellompi.out
echo "Done."
date
Write the job description for this job:
&

(count = 4)
(jobname = "hellompi")
(inputfiles =
  ("hellompi.sh" "")
  ("hellompi.c" "")
)
(outputfiles =
  ("hellompi.out" "")
)
(executable = "hellompi.sh")
(stdout = "hellompi.log")
(join = yes)
(walltime = "15 minutes")
(gmlog = log)
(memory = 2000)
(runtimeenvironment = "APPS/DEMO/OPENMPI-2.0.2")
If you want to run a multicore job on a single machine, use count=4 and countpernode=4. If you have larger jobs (more than 30 cores), limit the number of worker nodes, on which the job will run. You will wait longer, for the worker nodes to drain, but the success rate of the job execution will be higher.
GPU job using CUDA
Measure the memory bandwidth with CUDA:
First the program cudatest.cu:
#include <stdio.h>

int main() {
  int nDevices;

  cudaGetDeviceCount(&nDevices);
  for (int i = 0; i < nDevices; i++) {
    cudaDeviceProp prop;
    cudaGetDeviceProperties(&prop, i);
    printf("Device ID: %d\n", i);
    printf("  GPU, device name: %s\n", prop.name);
    printf("  Memory Clock Rate (KHz): %d\n",
           prop.memoryClockRate);
    printf("  Memory Bus Width (bits): %d\n",
           prop.memoryBusWidth);
    printf("  Peak Memory Bandwidth (GB/s): %f\n\n",
           2.0*prop.memoryClockRate*(prop.memoryBusWidth/8)/1.0e6);
  }
}
Execution script cudatest.sh:
#!/bin/bash
env| grep -i cuda > cudaenv.out
nvcc cudatest.cu -o cudatest
./cudatest > cudatest.out
And finally the job description:
&
(executable="cudatest.sh")
(inputfiles=
("cudatest.sh" "")
("cudatest.cu" "")
)
(outputfiles=
("cudatest.out"  " ")
("cudaenv.out"  " ")
)
(stdout="error.txt")
(join=yes)
(gmlog="log")
(jobName="cudatest")
(walltime="10")
(count="1")
(memory="500")
(runtimeenvironment="APPS/DEMO/GPU")
Singularity
- Permissions: user inside == user outside, if you want to have root permissions, you need to be root on the host system
- Customization of the runtime environment without administrator privileges on the cluster (portability): create an image on your desktop and use it on the cluster
- IO is passed directly through the container – bound directories from the host
- no impact on performance
- limitations: devices, drivers, stability of overlayfs, to bind directories from host, they need to exist in the container

Multiple options how to use Singularity. Some images are and will be available on the cluster. They will be bound from the cvmfs (cvmfs.sling.si) – not available yet.
Use the image from Docker or Singularity hub
singularity exec --nv docker://nvidia/cuda:latest nvcc --version
Docker image path: index.docker.io/nvidia/cuda:latest
Cache folder set to /net/jost/home/gen009/.singularity/docker
[10/10] |===================================| 100.0%
Creating container runtime...
tar: usr/local/cuda-9.0/.wh..wh..opq: implausibly old time stamp 1970-01-01 01:00:00
tar: usr/share/doc/cuda-cudart-9-0/.wh..wh..opq: implausibly old time stamp 1970-01-01 01:00:00
...
...

WARNING: Skipping user bind, non existent bind point (file) in container: '/usr/bin/nvidia-smi'
nvcc: NVIDIA (R) Cuda compiler driver
Copyright (c) 2005-2017 NVIDIA Corporation
Built on Fri_Sep__1_21:08:03_CDT_2017
Cuda compilation tools, release 9.0, V9.0.176
Or if you want to use the latest Ubuntu image:
$ singularity exec docker://ubuntu:latest echo "Hello from the container"
Docker image path: index.docker.io/library/ubuntu:latest
Cache folder set to /net/jost/home/gen009/.singularity/docker
Creating container runtime...
Hello from the container

singularity pull docker://ubuntu:latest
singularity build ubuntu.img docker://ubuntu:latest
$ singularity exec docker://fedora:latest cat /etc/redhat-release
Docker image path: index.docker.io/library/fedora:latest
Cache folder set to /net/jost/home/gen009/.singularity/docker
[1/1] |===================================| 100.0%
Creating container runtime...
WARNING: Could not chdir to home: /net/jost/home/gen009
Fedora release 26 (Twenty Six)
Multiple collections available on the hub:
- https://singularity-hub.org/collections
- https://hub.docker.com/explore/
Use the image on the cluster
Images will be eventually available on the cvmfs filesystem, which is automounted when required. For example, to use the CUDA container, you can run:
$ singularity exec /grid/arc/sw/singularity/cuda-latest.img cat /etc/os-release
NAME="Ubuntu"
VERSION="16.04.3 LTS (Xenial Xerus)"
ID=ubuntu
ID_LIKE=debian
PRETTY_NAME="Ubuntu 16.04.3 LTS"
VERSION_ID="16.04"
HOME_URL="http://www.ubuntu.com/"
SUPPORT_URL="http://help.ubuntu.com/"
BUG_REPORT_URL="http://bugs.launchpad.net/ubuntu/"
VERSION_CODENAME=xenial
UBUNTU_CODENAME=xenial
Use your own image
Put your image on an external location, such as dCache, https, ftp. Specify the path in the InputFiles (xrsl), then run your workload within the container.
Exercise/Homework
The goal of the homework is to familiarize yourself with the system and to successfully submit a number of jobs, retrieve results and finish the task using the remote interfaces. You are allowed to use the provided access to pre-installed VM image or install and run the software from your own system.
The task is to use the Monte Carlo method to calculate the number π (PI, if your Unicode fails you). The premise has been explained at the Workshop, but to reiterate:
If we imagine a square with side 2r inscribed with a circle with radius r, we know that the area A of the circle is π × r², and the area of the square must be 2r² – therefore the ratio of the area of the circle to the area of the square will be π/4. This means that if you randomly pick N points inside the square, approximately N × π/4 of those points should fall inside the circle.
Using the Monte Carlo method (a large number or random examples), we can therefore get a large number of examples and estimate the ratio between the points inside and outside the circle to estimate the value of π. In order to do that, our program will generate a large number of random points and check for each point whether it is located inside or outside the circle. We can then use the result to estimate π in the following way: π = (4×m)/n, where n is the number of points and m is the number of points inside the circle.
it is easy to set this up to check if a point is inside the circle by checking x² + y² < r², where x and y are the coordinates of the point and r is the radius of the circle.
It is possible to trivially combine multiple sample runs to get a better estimate, so this problem is in the category of “embarrassingly parallel problems” where you can run parallel jobs without any inter-job communication and combine the results in post-processing.
There is a number of online references for this idea, including code examples, alternate set-ups (using a quarter of the circle, for example) etc. You are allowed to use existing code snippets or write your own, as long as you manage to run the jobs on the cluster provided to complete the task.
There are some different options according to the desired level of complexity/challange:
- Calculate the number π on a single machine with one long or multiple sequential jobs
- Calculate the number π on multiple machines (using MPI) or, perhaps, using NVidia/CUDA.
- Calculate number π in your own container on the grid.
Please use support@sling.si at any time to get regular user support.
Final note: The same approach of using Monte Carlo method for estimating values that are difficult to approach analytically is used extensively in many fields with real problems, for example in complex mechanical problems, in the calculation of volumes of complex bodies (phase space calculations), and especially where the volume is defined by a probability function (i.e. when touching on quantum mechanics). The same approach is adaptable to many other fields, but is comparatively easy to implement and profits extensively by the use of a large computing resource since it is intrinsically slow (or, if you like, CPU intensive).
Exercise/Homework Report
The goal of the work is to successfully use computing resources. Please submit your programme, running script, job description file and any output files from the jobs (with logs) in an archive, and include or add a short report explaining: (1) your approach to the problem, (2) any problems with the platform; (3) the way you used jobs/tasks and (4) the final result (Pi estimation, number of points, number ob jobs, complete calculation time etc).
Thank you!

